

Although Windows 7 has reduced the number of times I choose to do a clean install these days there are still some steps I take to customize the OS to fit my way of using it whenever I do start fresh.
I thought it would be interesting to share those steps here and see if we have anything in common.
Now, before you all give me a hard time about not installing anti-virus software or the like first – that is not what this post is about. These are system tweaks I make in Windows 7, using Windows 7 tools and settings towards usability. Security and protection are automatics before these even happen :-)
Step 1: Customize Folder Options

On the Folder Options General Tab:
- Browse folders: Select Open each folder in its own window – I am constantly browsing drives, folders and network shares and prefer that each get their own window instead of replacing some data I may already be looking at.
- Click items as follows: Select Single-click to open an item – I just like the idea of a single click to open things. It does save a click each time which must add up eventually :-)

On the Folders Options View tab:
- Advanced Settings: Select Show hidden files, folders and drives – I like being able to delve into my system and like being able to see everything on it.
- Advanced Settings: Select Hide extensions for known file types – this allows me to see the specific file type instead of just depending on the icon next to the file name. Some malware uses this method to obscure a programs real purpose and so I like it for security as well.
Step 2: Set up Internet Options in IE

On the Internet Options General tab:
- Home Page: Select Use blank – this lets IE open up quickly and I can go straight to the page I want instead of wasting time loading a default webpage.
On the Internet Options Content tab:
- Auto Complete: Turn on for web forms and passwords. I am the only user on my system and log in so I am OK with this info being saved for me. Speeds things up as well.
On the Internet Options Advanced tab:
- Browsing: Uncheck Reuse windows for launching shortcuts. Same reason as in Folder Options for opening each folder in its own window.
- Browsing: Select Use inline auto complete (outside of Internet Explorer). This gives me access in the address bar in Windows Explorer to my browsing history.
- Multimedia: Select Show image download placeholders. When browsing without graphics turned on this keeps the space reserved based on the size specs for the image in the HTML code. It also keeps your page properly formatted.
Step 3: Desktop Customization

On the Desktop Icons tab:
- Select all Desktop icons (Computer, User’s Files, Network, Recycle Bin, Control Panel). I am a fan of a clean desktop but these are vital for me to access their functions easily from the desktop directly.
Step 4: Start Menu

On the Taskbar and Start Menu Properties Customize tab:
- Uncheck Highlight newly installed programs – I am usually aware that I just installed a new program and prefer not to have the highlighting.
- Uncheck Open submenus when I pause on them with the mouse pointer – I ant to control when I move to a submenu myself while browsing the Start Menu.
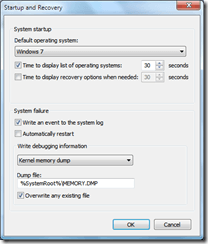
Step 5: Start Up and Recovery

On the Start Up and Recovery tab:
- Under System Failure unselect Automatically restart – this will leave any Blue Screens on your system until you restart the system. I prefer this for troubleshooting so I can read the blue screen. With this box checked the system will restart after the error is shown briefly.
Now your turn – what are the first steps you take to customize Windows to your preferences?