

During the development of the recently released April 2018 Update for Windows 10, aka Redstone 4, there was a bug when using the Disk Cleanup options to remove previously installed test builds.
For background – when a new build of Windows 10 is installed it creates a folder called Windows.Old and stores all of your files in there in case there is a need to roll back your system. This roll back could occur due to an install error or the user had 10 days to manually roll back their systems. After 10 days that old data, taking up anywhere between 15 to 20GB, would then be marked for removal.
User could also initiate this removal manually using the Disk Cleanup process in Windows Settings. That process in Redstone 4 was working just fine and all of the files in Windows.Old were being deleted. However, a bug was preventing the folder itself from being removed.
Multiple build installs, much like what happens in the Windows Insider program during a feature update development cycle, would result in a number of these folders being left behind.

Windows.Old Folder Remnants from Redstone 4
While this was not causing any issues on a device nor taking up any storage space it was still an issue for those who like a clean root directory from an aesthetics angle.
This bug has been fixed and is not happening in current Redstone 5 development builds but you still may have leftover empty Windows.Old directories on your system from Redstone 4. Well there is a simple command line string that will remove these extra empty directories from your device and give you a nice clean C:\ root directory.

Clean C:\ Root Directory on Windows 10
Caveat: You must have already used the Disk Cleanup tool at Windows Settings > System > Storage > Change how we free up space automatically so that all of the files are removed from the Windows.Old directories. Otherwise this command line sequence will fail.
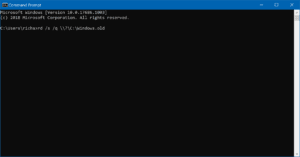
So open a Command Prompt on your system and be sure to run it with Administrator permissions. In that Command Prompt dialog box insert the following command:
rd /s /q \\?\C:\Windows.old
It will look like this in the Command Prompt dialog box:
Once the command is typed or copied in just hit return/enter. If it is correct you will simply see the Command Prompt appear again for the next command and the Windows.Old directory should be gone from C:\.
If you have multiple Windows.Old directories, they have a (X) appended to their names and X being a number, just use the same command but add the (X) to the directory name.
Once you go through this for all of the Windows.Old directories you have in C:\ you should be good to go.
Note: In case you are curious about that command and its switches – rd stands for remove directory; the /s is for removing the entire directory tree; the /q is for quiet mode and no prompts to confirm removal of directories. The remainder of the command string provides the location of the directory you want to remove – in this case Windows.Old.
Whatever you do make sure you are accurate when typing in the command string and that the directory name matches the one you want to remove.
As always proceed carefully but proceed at your own risk!
5 Comments
Trackbacks/Pingbacks
- Show Notes for Observed Tech PODCAST Episode 268 #OTP | WindowsObserver Wiki - […] How To: Remove Those Empty Windows.Old Folder Remnants | WindowsObserver.com […]
That was tribble problem, thanks you. It’s work for me
Thanks for letting everyone know it worked for you as well. Glad to hear others are finally able to solve this issue.
I am glad to find your post. I have been looking for a solution to this problem for a few weeks. It works! I have 2 PCs, one with 10 and the other with 7 of these directories. I ran the command line on each of the directories to clean them.
I am glad to hear that it worked for you as well. It is not a huge hindrance but nice to clean things up. Thanks for sharing your results and letting others know there is a solution to this problem.
That is good to hear – thanks for commenting here so others know it can work finally!