SSD’s or Solid State Drives are starting to become reasonable in regards to cost so more and more people are going to be looking at them for every day use on their computer systems.
Last year I installed an SSD in my ASUS Netbook and it has performed great and I am very pleased with it. You can read about that experience here – Upgrading to a Solid State Drive (SSD) on my ASUS Eee PC 1000HE.
I recently decided to make that same move on my desktop with one additional accommodation. I am going to use the SSD as the boot drive for Windows 7 and then use a SATA II standard hard drive as a storage location by placing all of my documents, videos, pictures, downloads, etc. on it to save space on the SSD. I even moved the temporary directories used by Windows to that drive to keep them from building up on the SSD.
The purpose of this post is to show you the process of getting to this configuration.
The first thing is to make sure you back up all your data because when you replace your main drive with the SSD I recommend a clean install just to be at a good starting point. There are separate challenges with restoring a larger drive image to a smaller drive that I opted to avoid for this upgrade.
Installing an SSD drive in your computer is no different then installing a standard hard drive. The SSD I got was a OCZ 60GB Agility 2 SATA II Solid State Drive and it uses the same power and data connections as the standard SATA II drives. The entire Windows 7 install along with my default programs take up just over half of that drive.
Installing Windows 7 works the exact same way as well so no big surprise there. I did opt to keep the second drive out of the system until the installation was complete.
So after Windows 7 is installed, you have run Windows Update to get all the released updates, your programs are reinstalled, your secondary hard drive is installed and BEFORE you copy your data back to the system take these steps to make the secondary hard drive your default storage drive.
Start by opening your user directory which is that shortcut on your desktop that is labeled with your Windows User Name:
Open that up and you should be presented with this window:
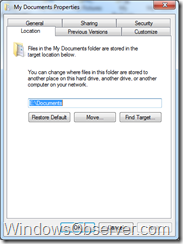
To change the default location of your My Documents directory just right click on it and select properties and then click on the Location tab:
Click on the Move button and select the drive and directory you want to store your documents in. For me it was the E drive which was my 320GB hard drive. You will get a dialog box that confirms you want to move that directory so go ahead and acknowledge that. At this point your documents will get moved to that directory.
Do this same process for your Pictures, Videos, Downloads, Podcasts and Music directories to get them all moved to the secondary drive. Although you have moved the default storage location for all those files when you click on your user directory it will look exactly the same as it did before the moves. That is the intended result – your files are still stored on the new drive.
At this point you can move all your data back to the directories from where ever you stored it during the reinstall.
The last step of this process is to change the directory that Windows uses to store temporary files as it operates throughout the day. To do that go to the View Advanced System Properties Control Panel app:
Click on the Environment Variables button at the bottom of the tab to bring up the user variables properties dialog:
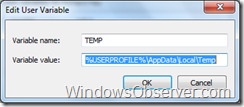
Click the Edit button and get the next dialog where you change the default TEMP directory.
On my install I used E:Temp – I had previously created that directory on my storage drive. Once you have done this one go back and make the same change for the TMP variable.
Once you have closed out all the dialogs I recommend a reboot just to get everything using the new temp defaults. This reboot should be much faster then they were on your old spinning hard drive.
On my system I saw my hard drive score increase from a 5.2 to a 7.3 on the Windows Experience Index and boot up time is about 18 seconds after the POST screen. You will also see some speed increases as you access your programs on a regular basis while your working on the system.
I am very pleased with the speed boost from this upgrade and I look forward to seeing the cost of SSD’s continuing to drop because I certainly have room for more in my systems.
So has anyone else tried this – how was your results?


